In most cases, a single set of relationships of accounts to master accounts will suffice as a framework for a master trial balance. You set up these relationships, or mappings, in Step 2 of Create an Account Map or Edit Account Map. However, if despite using the same charts of accounts, certain reporting units require slightly different account mappings, you can set up reporting unit exceptions in an account map.
When you use an account map with a reporting unit exception to create a master trial balance, all of the source trial balances you include are analyzed to determine which reporting units appear. If a reporting unit exception exists in the account map for any of the reporting units present in the source trial balances, reporting unit exception mappings are used for their data. The data for all other reporting units are processed using the relationships in the Primary section of the account map.
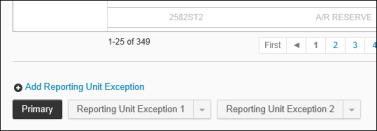
The first section of every account map is called Primary. Primary exists in every account map by default. Primary mapping relationships apply to all reporting units unless you create a reporting unit exception. A reporting unit exception presents the same charts of accounts and automapping rules as Primary, but when you create a reporting unit exception, you can set up different relationships that apply only to the reporting units you specify. Each reporting unit exception has its own button at the bottom of the mapping page.

You can create as many reporting unit exceptions as you require. They can be as similar or as disparate as you want. They can represent alternate mapping rules for a single reporting unit or a whole group of reporting units.
Creating a reporting unit exception

Remember that account mappings for all other reporting units are represented in the Primary section. You can click the Primary button and edit those relationships further, but your changes will not be reflected in the reporting unit exception. Though part of the same account map, these sections function independently of each other.
Creating multiple reporting unit exceptions
The procedure is the same as the one above for every reporting unit exception you create. Each time you create a reporting unit exception, the Primary section is cloned, regardless of how many reporting unit exceptions already exist in the map. Each reporting unit exception applies to the reporting unit or group f reporting units you choose and each one is given its own button at the bottom of the page.
Editing reporting unit exceptions
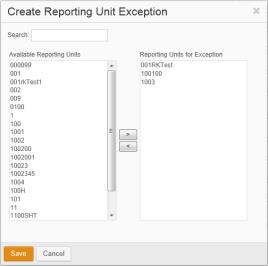
You can change the mapping relationships in any reporting unit exception at any time. Simply click its button at the bottom of step 2 of Create an Account Map or Edit Account Map and change mappings as required. To change the reporting units to which a reporting unit exception applies, click the down arrow in that exception's button and choose Edit. In Edit Reporting Unit Exception, edit the Reporting Units for Exception list so that it includes the reporting units to which the exception should apply.
Deleting reporting unit exceptions
To delete a reporting unit exception from the active account map, click the down arrow in that exception's button in step 2 and choose Delete.
Importing and exporting reporting unit exceptions
You can import and export mapping relationships for reporting unit exceptions as part of the entire account map import or export. If you're viewing step 2 of Create an Account Map or Edit Account Map, and the active account map contains reporting unit exceptions, when you click the Export link an Excel workbook is created for download with a worksheet for the Primary section of the map and a worksheet for each reporting unit exception. This workbook can be re-imported at any time by clicking the Import link and choosing the file.
If you want to import mapping relationships that include reporting unit exceptions from scratch, click the Download Import Template link to obtain the template. The template contains only the Primary worksheet. Add a worksheet for each reporting unit exception whose mappings you want to import. Be sure to name them Reporting Unit Exception x, where x represents the number. Reporting unit exception imports must contain all mapping relationships, not just the ones that differ from the Primary section. After the import is complete, click the down arrow in each Reporting Unit Exception button in the active map and choose Edit. In the Edit Reporting Unit Exception, add the reporting units to which the exception should apply to the Reporting Units for Exception list.